Welcome to my
Perfectly Imperfect Life..........
Showing posts with label press. Show all posts

Monday, July 15, 2019

20 Great Deck Ideas to take Summer Entertaining to the Next Level


HomeBNC has done a feature on
20 Great Deck Ideas to take Summer Entertaining to the Next Level
and has included mine!
Look for #12


Happy Happy Joy Joy!

Monday, December 31, 2018

"This could have been preventable," Stanislaus Sheriff on police shootin...


12/28/18 - Press conference at the Stanislaus County Sheriff’s Department in regards to significant developments in the Newman investigation.


Pretty much every legislator in California ignored the killing of Corporal Ronil Singh. In fact, of the only politicians who even mentioned Singh's tragic death was House Majority Leader Kevin McCarthy (R). Rep. Eric Swalwell (D) did retweet something said by New York Police Department Commissioner O'Neill saying he was thinking of the family. LINK


Community Vigil honoring Cpl Ronil Singh
 at Newman Downtown Plaza


Friday, July 27, 2018

Deck Makeover ~ Mermaid Style?


I did it again,
yep ~ started too many projects at once

why? who knows
I have so many ideas swirling around in my head
for the backyard.

I think "oh I can get that done in X days",
 only not to be able to
 due to real life interruptions.
Or my body ''screaming not today sister!''
So I move on to less taxing projects........

Here we go, the first in a series of fun updates,
decorations, and odds and ends of surprises!

The Deck was first

I started this early last Fall 
and am happy to say I did finish it before winter!

I was so tired of looking at my old stained, 
worn 24 yr. old BROWN deck.


At the time everyone was talking Unicorns....they still are.

I lean toward more pastel colors...like Mermaids.
Yes, that would be it. 
My own Mermaid colored ocean right out my back door.

Can you tell I haven't been to the beach for a while 
and definitely need my FIX!

Anything to get some "ocean breeze"
and cover that has-been deck.


Being the frugal person I am, 
I gathered all the leftover paint from other projects,
 yard sales, left from moving neighbors, 
hand-me-downs, etc. - even some old craft paint. 


Some I mixed to make the "mermaid" colors I wanted,
some I didn't have to.


I did a section at a time.
Painted on a couple of colors on a few boards,
then went over the same boards with just a squiggle of a different color.
I then dipped a clean brush into a pail of water and 
used it to blend all the colors together.
This kind of thinned the paint so you could 
see the grain of the wood in some spots.
Cool!


I alternated the base colors and top colors throughout.
Sometimes I squirted just the craft paint hear and there
and used the "water brush'' to blend.


I wish I could have done larger sections at a time, 
but fit in when time and body allowed. LOL


I am in love with how it turned out!


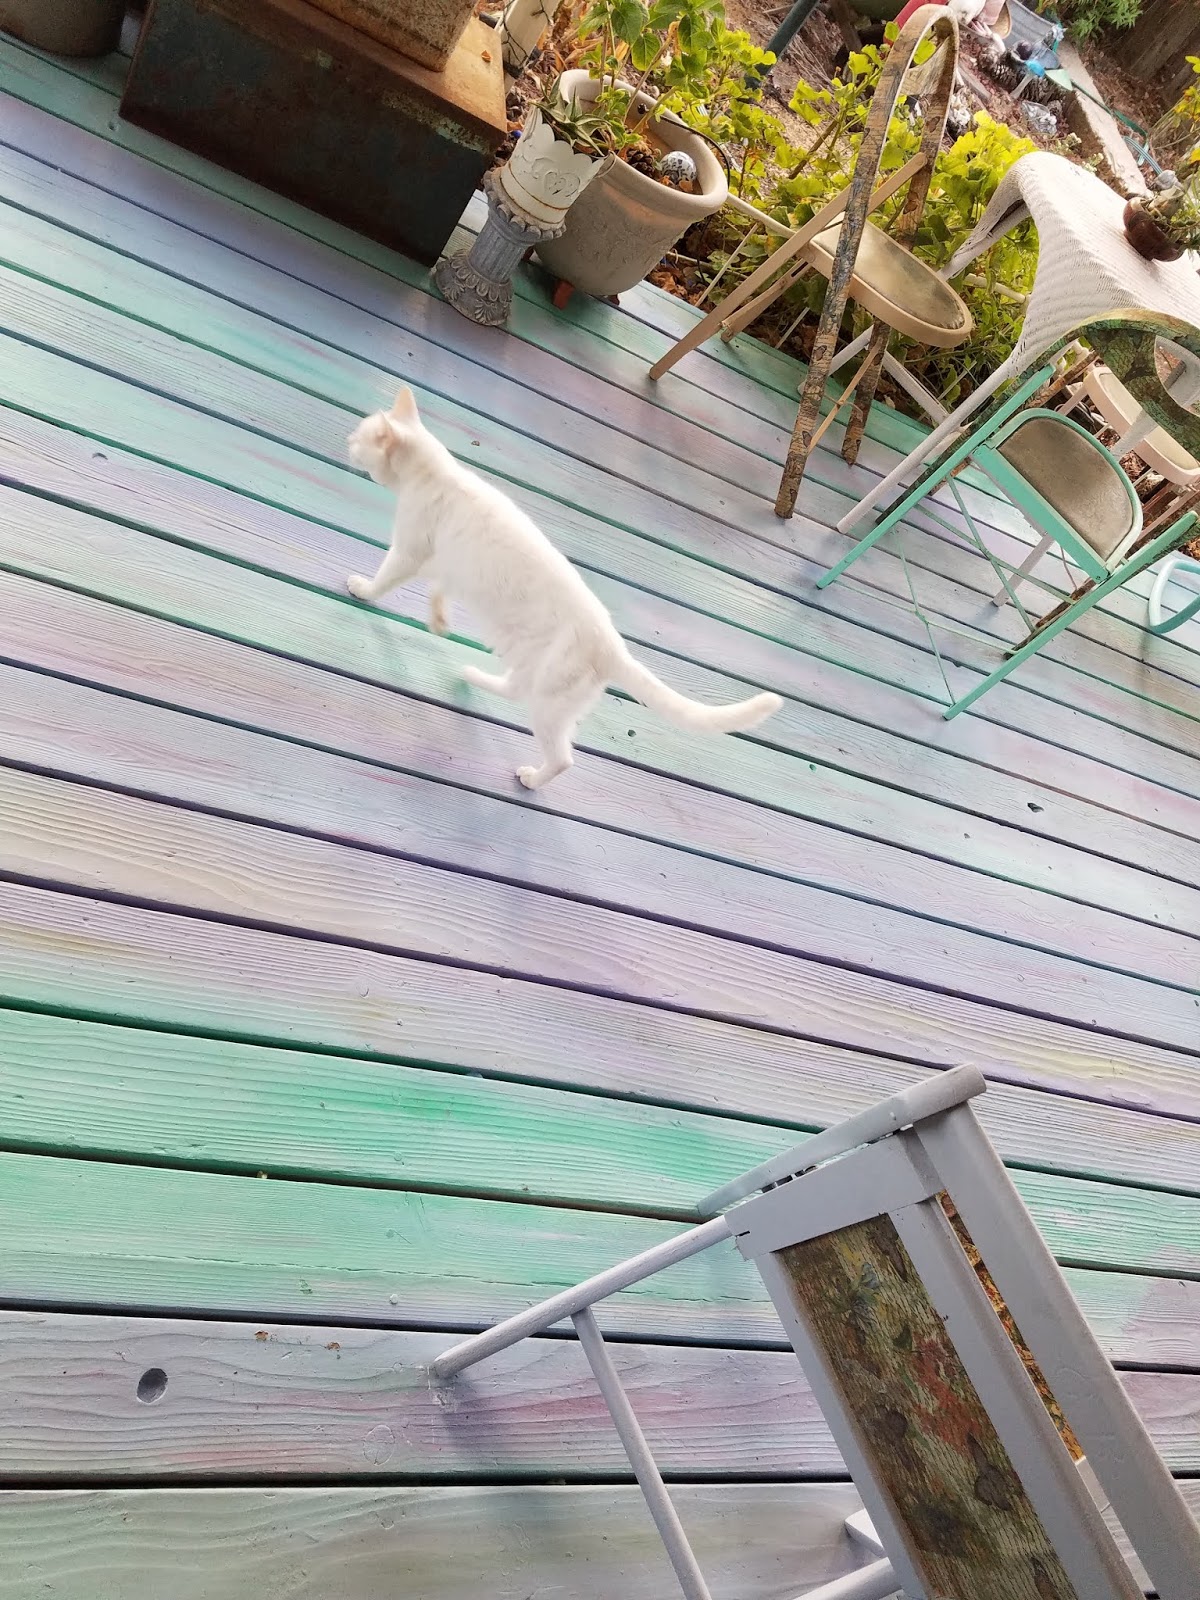
Mama Kitty photo bomb.
RIP Mama


For not knowing what I was doing, 
I have to say it turned out pretty darn good!
I love the way it coordinates with 


Best of all ~
cost $0.00
and cleared out lots of paint cans!

Update

 HomeBNC featured my deck in their
20 Gorgeous Deck Ideas for Summer!!


Other posts you may find interesting:

Thursday, November 3, 2016

Interview with Dragonfly Treasure

I was recently interviewed by 
Jordan Mason from
 Floor Coverings International.
Thank you Jordan, I'm honored.

~*~*~*~*~*~*
At Floor Coverings International Southlake, we love to bring you creative insight and perspectives from some of the most influential bloggers on the web. Our latest interview features arts, crafts, and home and garden blogger Deb of Dragonfly Treasure. You can follow Deb on TwitterFacebookPinterestGoogle+LinkedIn, and Instagram.


What’s one of your favorite design pieces you have in your own home?


I’d have to say an old single pane window I used to transform into “A Day at the Beach” memory piece that currently is hanging in our beachy hall bath. I mixed some glue with sand to add along the bottom to represent the sea bottom. A mermaid silhouette and seashells reside there. A few off white sheets of paper dance in the pane to act as mats for photos of my family at the beach or somewhere near water – circa 50’s-60’s. My favorite was dated 1929 and showcases Bathing Beauties relatives that were before my time. Netting entwined with sticks, starfish, teeny glass bottles, and a run aground wooden boat on the side complete the piece.

What is your favorite design trend of 2016?


Mixed metals I’m excited about. Not just silver and gold but even copper, pewter, bronze and others – RUST even? Seems like anything goes now, even though I’ve been doing this to a small degree, now it’s OK! Like I listen to the trends! Even mixing materials is now popular – metals, stone, wood. I always called it “Eclectic Poor!” ðŸ˜‰Also multiple mirrors. I love mirrors and have a few vintage ones hanging/standing in front of one another by size. All of a sudden I’m trendy; not sure how that happened.

Do you follow any other blogs for inspiration? If so, which ones?


Years ago I used to have time to follow a few blogs. These days I’m afraid to say I just don’t have the time, but I spend many hours in doctors lobbies. I peruse magazines like crazy, sometimes several times over the same zine. Once the “home” zines are done, any subject will do – hey, they have ads in them. My advice? Take the time and devour the photo, piece by piece, just as you do the good zines. You’ll be surprised at the ideas/inspiration you’ll come away with.

Can you explain a recent project you’ve been working on?


I recently finished something that had been waiting in the wings for approximately 10 years, I’m ashamed to say. And it took a challenge for me to do it! I picked up three wooden folding chairs with dark green leather seats. They were in pretty amazing shape and were a steal. There was also a different style that was all wood that I also grabbed from the same thrift store. I could see the leather seat style, in my minds eye, with a white frame against the dark olive leather seats – gorgeous. Then life happened. Fast forward to this spring.
Mother Nature had gotten to the chairs and did her thing. The wood backs were dry, warped, peeling, and past their prime for painting. But I buckled down and scraped, sanded and glued. They still weren’t in good enough shape to paint outright, but much better than before. The leather had held up its end well, so I wanted to keep it original. I decided to paint each chair frame a different color–mint, beige, pink and blue. I knew the backs wouldn’t come out looking as well as envisioned years prior, but I painted them anyway.
Then I got the idea of covering them in napkins. I figured the imperfections in the backs would be harder to see with springy garden napkins over it. I fell into the perfect napkins at an inexpensive store I frequent. I decided to cover only the backs and legs. I then separated the napkin layers, Modge Podged them on, easy as pie, and tore as I went to fit. Once I was all done, I gave it a good two days to dry/cure, then coated all the napkins again for a final sealant coat. They still fold up nicely too!
I love the way each of the different colors show through the napkins on the backs of the chairs. They all coordinate well, but each is unique.


Tuesday, June 9, 2015

Interview with Home Improvement Blogger Deb Newton

I was recently interviewed by Danielle Lehman from
 Floor Coverings International.
Thank you Danielle, I'm honored. 
~*~*~*~*~*~*
At Floor Coverings International of Winter Garden, we love bringing you creative insight and new perspectives. Today we have an interview with Deb Newton, home improvement blogger at Dragonfly Treasure.
1. Please tell us a little about yourself.
I have always loved to make things. Growing up I used my imagination to create things for entertainment. Living on a farm far from any other children, my friends were the animals. Daisy crowns for the Cows, Berry Bracelets for the Chickens, even a collection of empty snail shells from the garden, decorated and painted with nail polish.
I love taking items and re-purposing them in new ways. I probably get this from my Dad. If he needed a tool for example, he made it from what he had. Up-cycling is environmentally friendly and endless fun to me. I’m a big DIY’er. I adore anything old and try to incorporate it into something useful for my home or garden.

2. Why did you decide to start a blog?
At first it was to connect with people through like minded interests; gardening, treasure hunting, crafting, etc. Then it became a way to keep my spread out family up to date on my families happenings. It has changed over the years to reviewing products for companies, but is still peppered with the above.
What do you enjoy about blogging?
It has become a sort of therapy for me. Recently I went through a life changing event, which can leave you feeling like no one else could possibly understand. Being able to talk to others, who have been through a similar event, gave me the opportunity to glean from their experience, which can be invaluable.

3. How would you describe your design style?
My home is Vintage Eclectic Cottage, is that even a style? LOL I am lucky to have items from my parents and grandparents that I incorporate with more current, but comfortable Cottage styles. Any item, be it furniture or accessory has to make me smile or it’s not welcome. I need to be able to walk through my front door and smile that I’m home.
4. Where do you find most of your inspiration?
Pre-Pinterest – I try to look at things differently. It may take a while but eventually it comes to me.  What to do with that ugly thing I just new I could make beautiful, I picked from a garage sale!   I like to make something out of nothing. Grab a bunch of odds and ends, found items, whatever and sit down and create something marvelous. AND I do love magazines! which can give me more ideas in my head than I have time to make.
Since Pinterest started, I’m on inspiration overload! Addicted? Most definitely!
5. Tell us about a recent project you’re proud of.
I’m torn between two. Basically the same technique but one done outside, the other inside.
I painted faux brick on my front walkway. I mixed all the reds, browns, oranges and like colors from my craft paints to get the color I wanted. It had to be close to the old mismatched brick I hauled from the farm, that I lined my front gardens with. I used a sponge to stamp a brick pattern onto the cement and sealed it. I love the crooked way it turned out! Just like my crooked lined gardens.
The other project was to paint my cement floor in my bedroom. I chose white and when it was done it looked plain. I decided to find an image I liked and used my Dad’s old carbon copy paper to use to trace it on. I then used felt tip pens, nail polish, paint, and whatever else I had on hand to color the design. It was then also sealed.  The design I chose describes what I’m currently going through.  Dandelion seeds floating on the breeze that turn into birds.  I am currently learning “to fly free.”
Find more from Deb on her blog at Dragonfly Treasure.

**************

Thursday, December 20, 2012

Knocking-off Some Chimes


I have the best daughter-in-law!
Whenever she sees something different/cute she sends me a photo and says "You can make that!!" In this photo she meant the mason jar chimes.

Then I proceed to figure it out.
It usually doesn't come out exactly as what she saw because I always add my own twist by using what I have in my Treasure Pile.

I had just came across how to tint jars on Pinterest. There are several examples of how to do it. I combined Its Over Flowing and Creative Little Daisy.

I gathered my ingredients:
Jars
Mod Podge ~ 1/4 cup
water ~ 1 Tablespoon hot  
gel food coloring ~ to your liking
 (I didn't have gel food coloring, so I used what I had on hand) 
Mix all well.
*************
Pour some of the Mod Podge mixture into your bottle. Swirl it around to cover the entire glass on the inside Keep swirling and pouring to your hearts content or until you run out of jars or you need to mix more- which ever comes first  
Place a piece of aluminum foil on a plate then cover with
several paper towels and allow the bottles to drain for five to 10 minutes. I used newspaper and it worked just fine.

Set them on the counter, upright and wait about 5 more minutes, allowing the extra paint that did not drip out to settle on the bottom. Jars and bottles with a flat edge along the bottom will work the best for this technique. The bottom of my bottles have a little excess Mod Podge. If you try to tilt the jar again and pour it out, you’ll end up with streaks along the sides of the bottle.

I placed them up side down on wax paper 
Set the oven to it’s lowest temperature.
I checked on them about 20 minutes later or 
more until dry—transparent.

 Be sure the excess on the bottom has fully dried, too, before tilting the bottle.
Caution! These will be hot, be sure to use a pot holder. 
Remove from the oven and cool. Remove the gummy texture from the top of the bottles. If you prefer a darker color, do it again in the same jar…just be sure to cool the bottle first. 
This is exactly what I did because they came out to light the first time. Much better second time around.
I new I need lids for the tops and bottoms, so I E600'd used lids to some rings that needed to be replaced 


In hindsight I should have made the holes in the lids prior to gluing them. I ended up picking from the inside out because I didn't want to put pressure down on the lid that was glued and possibly popping it out. I just used and ice pick to make the holes.  I ended up painting them black. I used the heaviest fishing line I could find to add the copper tubes (which were also in my Treasure Pile) they were left over from when I made Solar Lanterns for the garden.  I used clear silicone to adhere lids to bottles. Silicone can handle the fluctuating temperatures outside better than anything else. Let cure for a couple days to be sure it's nice and stuck.
I made mine as the prototype first. That's why you see rusty tubing ;)  
I found a handle from a petite fore dish and used that for the clapper. I have it pulled to the side so you can see what I'm talking about. 
A Dragonfly catches the breeze to make it chime. 
Then I made some for gifts.

I found a few cheese shaker tops in my Treasures, so I painted them black and used them for the clappers on these.
I came across some metal filigree pieces that had a hole in them.
I dug through my beads only to find crystals that fit pretty good inside that hole. SO when the Sun shines I;'m hoping they get some prism effects going.


 Not as good as the ones she saw but I like the way they turned out...and that's all that matters anyway, right?
Hoping the recipients like them


*hugs*


Update

HomeBNC featured my chimes in their
50+ Ways to Repurpose Your Old Mason Jars
Other posts you may be interested in:

.

.
Blog Widget by LinkWithin