Have you ever noticed things have cycles when it comes to repair? You go along minding your own business then wham! Things start breaking, then it's one right after another! Hate those cycles.
Bella decided that the corner of the footstool Melissa made in High School looked yummy. So she chewed off the corner.
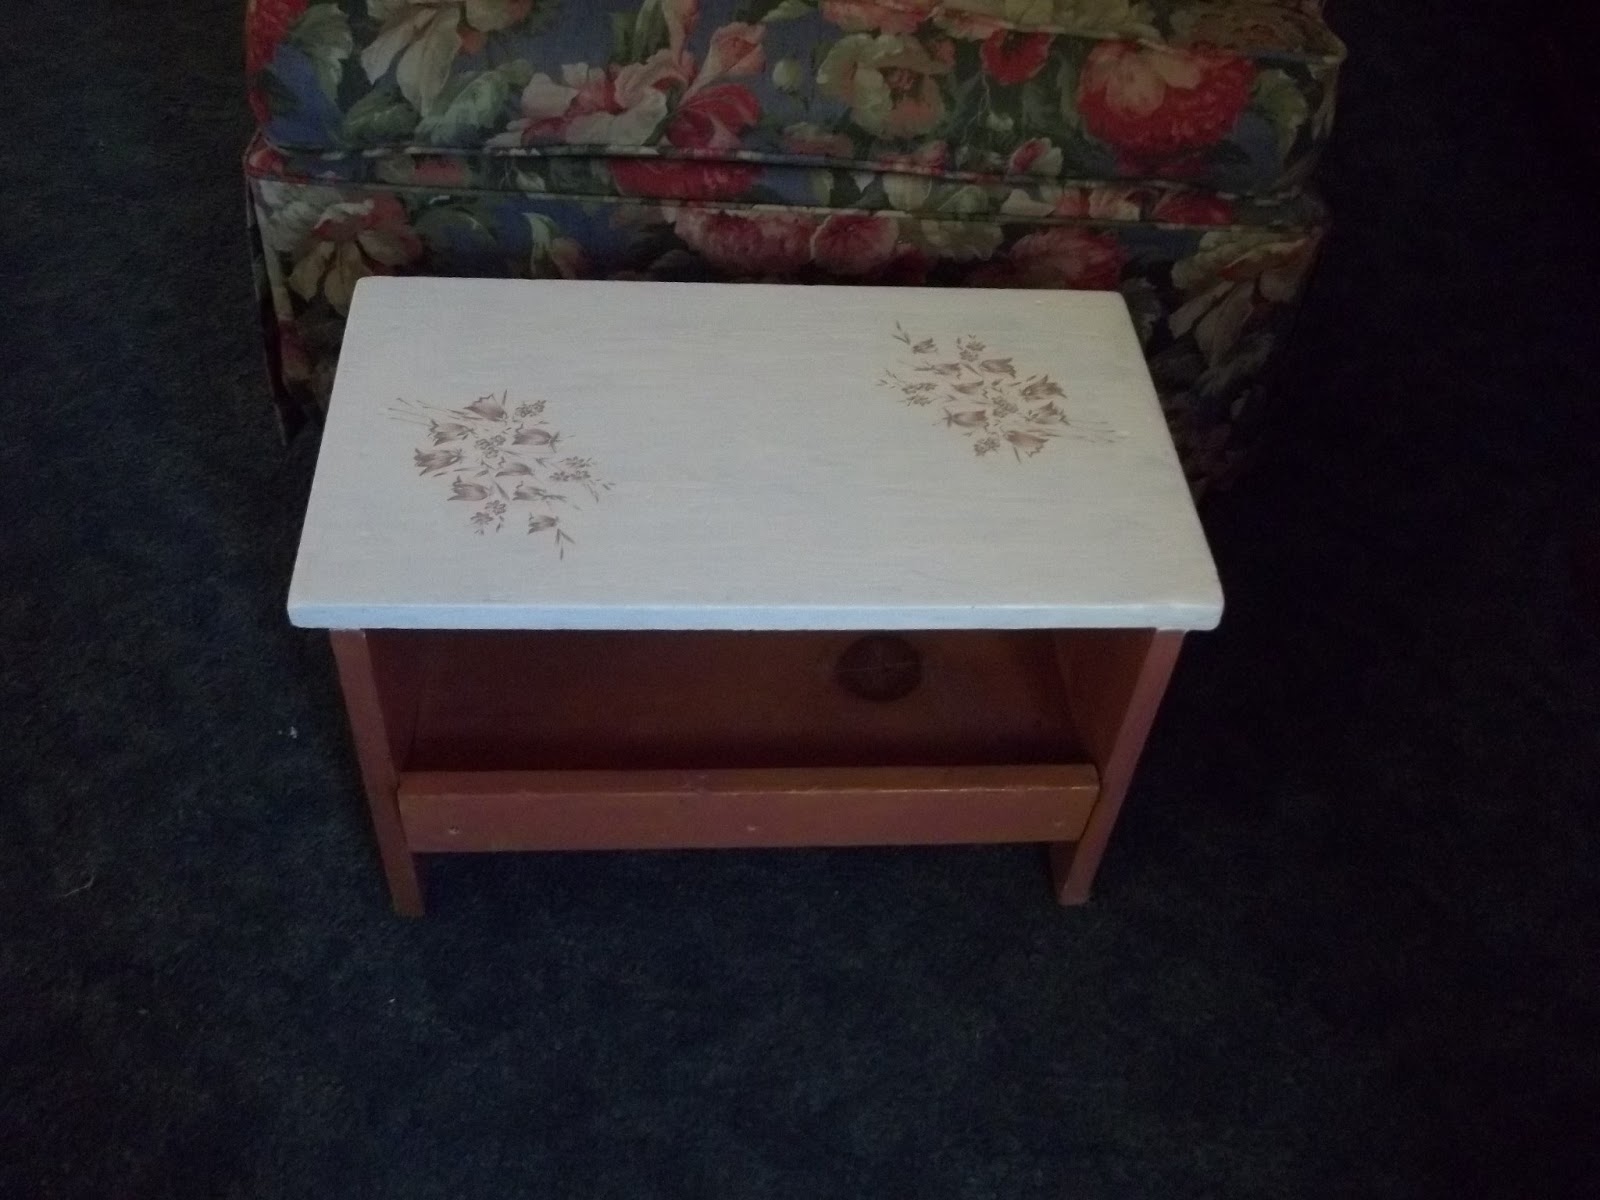
I remolded it using wood putty. Since I didn't have any pink stain left, and it probably would have stood out due to the putty, I decided to paint the top white and add some coordinating decals I had.
Not bad :)
While working on Melissa's, Tora thought the footstool Ty made in High School had a tasty corner too. What is it about the corners?? They have plenty of chew toys they play and chew up. Why they go after the stool corners is beyond me. Grr.
Time to turn my attention to Ty's.
But before I could Tora thought another corner
looked yummy on Melissa's!
Yep, I now needed to fix that corner.
I puttied it up, you can tell I was frustrated...this corner didn't get fixed as nicely as the first :/
Since I was out of decals I decided to just give it another coat of white and then searched for something I could paint on the top.
Once I found "it", out came Dad's stack of carbon paper again!
I love the meaning behind this quote,
so I used the same procedure as I did on my floor.
I love the way it turned out ♥
I had some paint that was an OK match.
I tweaked it with some other colors
to get it to the shade I wanted.
Once dry I sealed it with ''diamond glaze''.
OK, back to Ty's.
I puttied up the corner, sorry no photo's,
getting a little perturbed at these dogs,
and painted it white again.
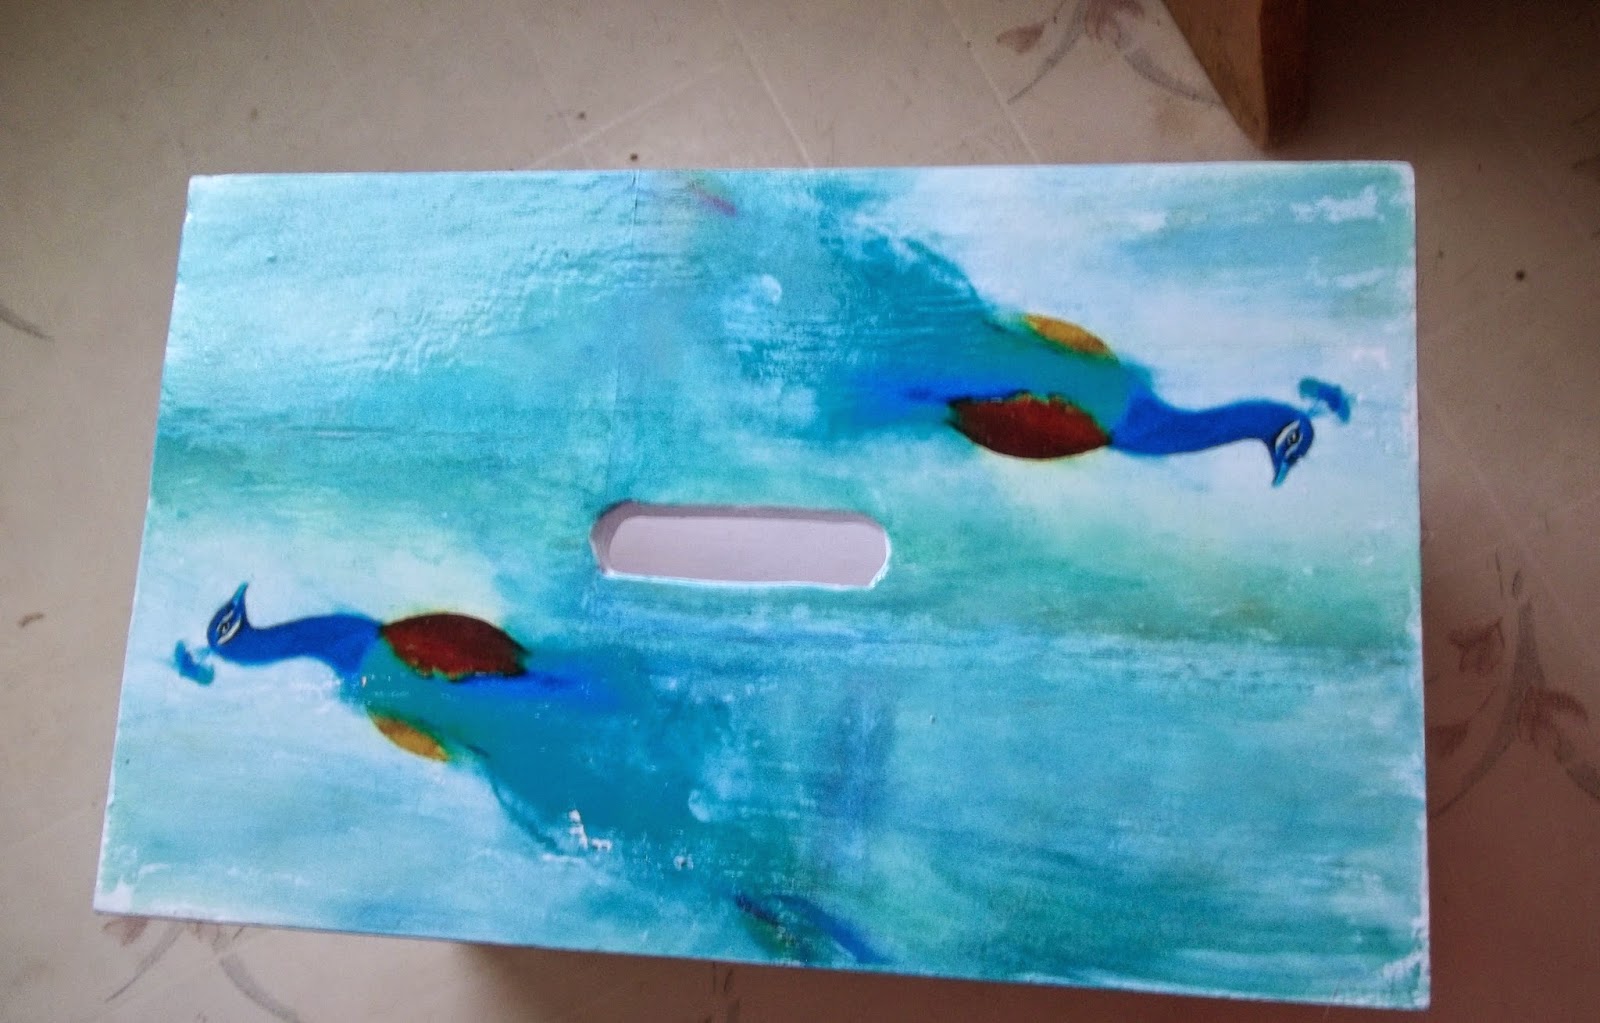
I had decided I wanted to bring in some blues to the living room and thought this was the perfect opportunity to get started.
Been kind of obsessing over Peacocks lately,
so searched for images.
I came across one I really liked. I didn't want anything to detailed because I wasn't sure how I was going to add it to the top.
I really liked this watercolor, but how to get it on top of the stool? Decoupage? didn't think that was the way to go, so I headed for Pinterest, where else?
Thought I'd try to transfer the image to the wood.
I had never done anything like this before and was hesitant but after reading several tutorials I decided to dive in and be done with these darn foot stools (and whoever took the next bite out of either were getting their teeth pulled! J/K I'd never actually do that, but .....).
So I printed out the image on regular printer paper
with my LaserJet printer.
I then coated the top of the stool with Mod Podge and glued it on.
I left it there a couple of days, life interrupted, but by then I knew it was defiantly dry at least!
The reason you see so many pieces of paper is because I decided to add 2 peacocks. I did not want the un-imaged areas to be left white, so I added pieces of the ''background'' from the original image.
I wet a sponge and started soaking the paper. As the paper got wet I could start to see the image through it. That's when I began to carefully roll the paper off with my fingers, bits started rolling up and off. I was really afraid that the image was going to come off too, but it didn't.
Sorry no photo's. By this time between being nervous about this procedure and fed up on working on stools, photo's were the last thing on my mind :/
Once ALL the paper bits were off, I sanded it just a bit so it didn't look so ''new''. I also got my paints out, watered them down and tried to blend the ''seams''. In my concentration I forgot to trim the white edges off the peacock images, so there were white "stripes" between the background pieces and the peacock images.
After working on it on and off for several days I realized it was as good as it was going to get. I sanded it lightly so that where I painted coordinated with the rest of the sanding I did earlier.
So here it is, finished and sealed with diamond glaze. Whew, glad to be done...so far, knock on wood, no bites have been taken out of either one!
~*~*~*~*~*~*~*~*~*~*
I turned my ceiling fan in my bedroom on the other day
and a blade fell off!
Now granted this poor fan has been through many moves and is about 24 years old. We picked it up for a song when stationed in Miami. Jefferson Ward (east coast Montgomery Ward) was going out of business, I remember going thorough all the boxes trying to find shades that weren't broken ;)
Eventually I did find enough intact.
Anyway, the blade broke at the bracket.
Not wanting to go through the hassle of finding another
and putting it up, let alone spending money I didn't have,
I decided to do what my Dad would do.
JB weld the sucker!
Mixed a dollop of the 2 tubes together
and I was ready to go!
Slathered on the mixture,
propped it in positioned to dry.
Waiting an extra allotted amount of time
to be sure it was well cured.
After all I don't want it to fly off!
Painted it gold to match the rest of the bracket
And voila! Fixed and still spinning.
Since I started this post M's fan blade did the same thing!!
What is it with these ceiling fans!!
Did the same with hers and it's back on and going strong!
Gotta love JB Weld!!
~*~*~*~*~*~*~*~*~*~*~*~*~
Next the dogs knocked over a birdbath ornament
and it snapped in half.
Yep, JB weld to the rescue again!
Slathered it on
propped it in place
Again waited an extra amount of time to
be sure it was cured.
Painted it to match
distressed a tad,
all fixed!
~*~*~*~*~*~*~*~*~*~*~*~*~*~*
Then my favorite hair comb broke
I once again used JB Weld
Once cured I painted it to match the best I could.
Works perfectly!
JB Weld has not endorsed this post. It is just my opinion of the greatest product out there for metal. Dad used it for everything! The best thing he ever taught me!
So next time one of your fave's gets knocked over or
breaks try JB Weld. Love this stuff!