Welcome to my
Perfectly Imperfect Life..........

Friday, July 27, 2018

Deck Makeover ~ Mermaid Style?


I did it again,
yep ~ started too many projects at once

why? who knows
I have so many ideas swirling around in my head
for the backyard.

I think "oh I can get that done in X days",
 only not to be able to
 due to real life interruptions.
Or my body ''screaming not today sister!''
So I move on to less taxing projects........

Here we go, the first in a series of fun updates,
decorations, and odds and ends of surprises!

The Deck was first

I started this early last Fall 
and am happy to say I did finish it before winter!

I was so tired of looking at my old stained, 
worn 24 yr. old BROWN deck.


At the time everyone was talking Unicorns....they still are.

I lean toward more pastel colors...like Mermaids.
Yes, that would be it. 
My own Mermaid colored ocean right out my back door.

Can you tell I haven't been to the beach for a while 
and definitely need my FIX!

Anything to get some "ocean breeze"
and cover that has-been deck.


Being the frugal person I am, 
I gathered all the leftover paint from other projects,
 yard sales, left from moving neighbors, 
hand-me-downs, etc. - even some old craft paint. 


Some I mixed to make the "mermaid" colors I wanted,
some I didn't have to.


I did a section at a time.
Painted on a couple of colors on a few boards,
then went over the same boards with just a squiggle of a different color.
I then dipped a clean brush into a pail of water and 
used it to blend all the colors together.
This kind of thinned the paint so you could 
see the grain of the wood in some spots.
Cool!


I alternated the base colors and top colors throughout.
Sometimes I squirted just the craft paint hear and there
and used the "water brush'' to blend.


I wish I could have done larger sections at a time, 
but fit in when time and body allowed. LOL


I am in love with how it turned out!


Mama Kitty photo bomb.
RIP Mama


For not knowing what I was doing, 
I have to say it turned out pretty darn good!
I love the way it coordinates with 


Best of all ~
cost $0.00
and cleared out lots of paint cans!

Update

 HomeBNC featured my deck in their
20 Gorgeous Deck Ideas for Summer!!


Other posts you may find interesting:

Wednesday, July 25, 2018

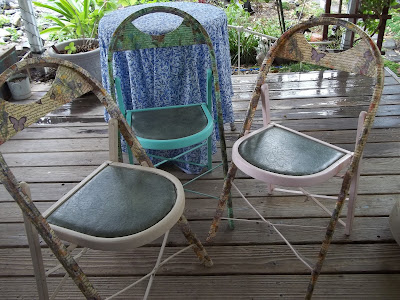
Updating Dated Folding Chairs


I finally started and completed a project that has been waiting...oh...about 10 years. 
Yes, I'm ashamed to say that!

The first project of the very beginning in my deck/backyard update.

I purchased these 3 folding chairs from a thrift many years ago along with another that was a different style (that I forgot to take a pic of).


At the time the wood was in pretty good shape and the green leather was and still is in great shape.
I pictured them with the original green leather seat
and the wood frames painted white.

Well, years passed - and passed - and passed -
 you get the idea.
We used them as they were.
Eventually Mother Nature got to them
and did her thing.

The wood definitely needed help.
It had dried out and started to peel.


I sanded and glued what I could.
I was over the white painted wood frame,
besides the wood wasn't in as good of shape as it originally was.

So what do I always end up going to?
Mod Podge, of course. 
I could use napkins to brighten them up. 
Being on a budget, I didn't want to
 spend a lot of money on napkins.
But in my minds eye, I could see more 
colorful chairs. The napkins would 
coordinate with the dark green leather seats.
I took a chance and stopped at Dollar Tree.

A light shined from above!
There they were, perfect as can be!


Different colors - check
Colors that would coordinate with the dark green leather seats - check
Writing - check
Gardeny - check
$1.00 a package - WOO HOO

What more could I ask for?
All the things I had swirling in my mind,
but didn't think I would find in one 
printed napkin I could afford.
Now to decide how many packages did I need?
Would the dinner or cocktail be better?

I ended up getting more than needed of each,
but better than running out!

I decided I didn't want matchy matchy, 
so each chair got a different color:
mint, beige, pink, and blue.


Only the backs and back legs 
received the napkin print.
I painted the whole chair 
so each color shows through 
the single napkin layer 
that was added to the chair.

When you decoupage napkins you
 remove the backing leaving the 
single layer front, which is what you use. 


It was really easy to do (my first time).
I put on the Mod Podge a section at a time,
then placed the image of the napkin
 I wanted to be in that spot.


If needed I tore off the extra.
All the torn pieces come in handy for small areas
that needed to be covered.
Torn edges blend in better than cut.


Once completed, I went back and 
added a few torn Butterflies
 on top of the already decoupaged napkin
where I thought they were needed. 


When done I gave it them couple coats of
Mod Podge to make sure they all had a good seal. 


I love the way they turned out.
I can still fold them up with out scraping paint or napkin.

Speaking of pretty napkins,
anyone need some??

Tuesday, July 17, 2018

If My Body Were a Car........


 This is just so funny - scary how true it is!  
 (and, if it's not true yet, rest assured it will be).
If my body was a car, this is the time I would be thinking about trading it in for a newer model.   I've got bumps and dents and scratches in my finish and my paint job is getting a little dull...
But that's not the worst of it . 

My headlights are out of focus, and it's especially hard to see things up close.


My traction is not as graceful as it once was.
 I slip and slide and skid and bump into things even in the best of weather.

My whitewalls are stained with varicose veins..


It takes me hours to reach my maximum speed. 
  My fuel rate burns inefficiently.

But here's the worst of it ... 


Almost every time I sneeze, cough or sputter, Either My Radiator Leaks or My Exhaust Backfires!

HAVE  A  GOOD  DAY. 


Sunday, July 8, 2018

More Lazy Gardener Tips

While laying in bed last night I was thinking of some other things I do for my garden. I thought you might benefit from them too.
And best of all they are FREE!
After steaming or boiling vegetables I save the water, 


let cool, then water a plants with it.


I usually look for the one that doesn't seem happy. This water contains a lot of nutrients that gets left behind by the cooking of the vegetables.

Another "eggselent" (sorry, couldn't resist!) nutrient rich water is left from making hard boiled eggs. Just like with crumbling the shells into the garden, this water provides the same nutrients but in a much more milder degree. Many years ago when I had a slew of houseplants and no yard, I used to keep a large lidded pickle jar filled with water under the kitchen sink. I would add eggshells to it from time to time, let sit and water my houseplants.


Leave the shells in the jar and refill with water. When it got so smelly that I couldn't stand it I would change out the eggs and start again. My plants were very happy!
Now we know I'm lazy but I also hate spending money when I can get what I need for free and it works so well. Take a look at my garden and I think you'll agree...this lazy gardener does OK =)

Sunday, July 1, 2018

Fun Fall Decor ~ Easy Potpourri Pie Craft


Want an easy gift that smells wonderful and looks like it took you days to make?!
Or one that looks like you bought it a boutique gift shop?
 Look no further ~ make this potpourri pie!

What you will need:
1 cup of flour
1 cup of salt
Water
Pie tin (any size)
Potpourri
Butter knife


Directions:
Mix together flour and salt, mix in enough water to
form a workable but not sticky, dough.

Heat oven to 250 degrees.
Roll out the dough into a large circle approximately 1/4" thick,
 just as you would for a regular pie.


 Line tin with the rolled out dough.
Wrap up leftover dough for later.

Cook pie crust for 30 minutes.
Let cool.

Fill cooled crust with potpourri.

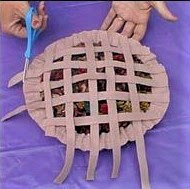
Take remaining dough scraps and roll into a large circle.
Cut into strips for lattice top crust.
Dampen dough to "glue" down to already cooked crust.
Trim ends.

Let top crust dry for 1-2 days.
Decorate pie anyway you like.


 Ideas include: fabric, ribbon, dried apples, cinnamon sticks....


.

.
Blog Widget by LinkWithin