
Welcome to my
Perfectly Imperfect Life..........

Friday, December 12, 2014

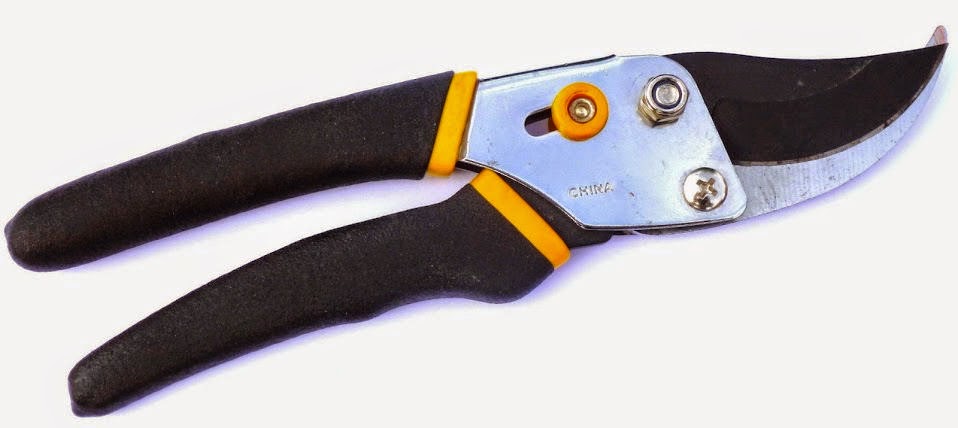
Bypass Hand Pruning Shears Review ~ #pruningshears


 Boy was I excited to be chosen to review these Pruning Shears by Whites! With pruning time in full swing, my umpteen year old hand pruners were ready to bite the dust.
I anxiously patiently awaited their arrival.

I opened them up and my first impression was that had a nice weight, not heavy like my old timers,
but not lightweight like some you find in the newer ones .
I'm told 8 1/2 oz. to be exact!
All steel robust construction makes them feel sturdy
 and well made.  
No weak aluminum parts to break.


I put them to work immediately.
I only had some lighter trimming left to do,


but found a few larger Roses which I missed a few branches on.
They went through the thicker stems just as easy as the smaller ones, with about the same effort.
I'm impressed!


What I loved the most was the non-slip grip on the handles.
It made them feel so secure in my hand,
I didn't have to constantly readjust them
 which made things move much faster.


I have some nerve issues with my arms which after any prolonged activity sends some pain/numbness down to my hands/fingers.
I found these to be very comfortable to use and didn't experience any of that uncomfortable feeling. 


Like I said, just some light pruning left ;)


Not only was I impressed while using these,
they come risk free with a no hassle 180 day unconditional guarantee from date of purchase!
That's a big 2 thumbs up in my opinion!
They are available here on Amazon.
What a great gift for the gardener in your life!

I received one or more of the products mentioned above for free using Tomoson.com. Regardless, I only recommend products or services I use personally and believe will be good for my readers.


Thursday, December 11, 2014

Blow Me A Kiss ~ Hershey's That Is! #MerryKissmas, #VoxBox

Blow me a kiss!


I'm so excited to be selected to receive my very first Influenster box! It arrived in the mail today!


A sweet treat indeed for the sweet tooth, the #MerryKissmas VoxBox! Who doesn't love the original milk chocolate Hershey’s Kisses? They bring back such childhood memories. That delicious chocolate melting in your mouth, oh don't get me wrong. I'd eat a couple first then savor some letting them melt in my mouth
 s l o w l y.  LOL 

They are so fun to wrapped in their seasonal colors for whatever Holiday it happens to be. And their assortment of flavors has become a much difficult decision. That reminds me, I need to get some Candy Cane Kisses!

A full bag of Hershey’s Kisses, what to do with them?
well, if it was up to the kids they'd be gone in 2 seconds flat!

Their are a ton of fun projects you can create with them and this is certainly the time of year to do it! For some inspiration check out Hershey's Kisses Crafts.

But I had to act fast!
The kids were chomping at the bit!
Here's a few very simple little ones can even do.

An Evergreen Wreath with red Holly Berries and silver bow 


 A simple triangle Christmas tree with red ornaments
and silver topper

This one has a trunk ;)

 Christmas Color Display

Ty made the cutest Tree!


 I was able to snatch them to hide long enough so I could
make a batch of Peanut Butter Blossoms!
YUMMY!

Here's the recipe in case you need it.

Ingredients:

48 HERSHEY'S KISSES Brand Milk Chocolates
1/2 cup shortening
3/4 cup REESE'S Creamy Peanut Butter
1/3 cup granulated sugar
1/3 cup packed light brown sugar
1 egg
2 tablespoons milk
1 teaspoon vanilla extract
1-1/2 cups all-purpose flour
1 teaspoon baking soda
1/2 teaspoon salt
Additional granulated sugar(optional)

Directions

Heat oven to 375°F. Remove wrappers from chocolates.
      Beat shortening and peanut butter in large bowl until well blended. Add 1/3 cup granulated sugar and brown sugar; beat until fluffy. Add egg, milk and vanilla; beat well. Stir together flour, baking soda and salt; gradually beat into peanut butter mixture.
Shape dough into 1-inch balls. Roll in granulated sugar; place on ungreased cookie sheet. 
Bake 8 to 10 minutes or until lightly browned. Immediately press a chocolate into center of each cookie; cookie will crack around edges. Remove from cookie sheet to wire rack. Cool completely. Makes about 48 cookies.

Need I say they were gone in the blink of an eye ;)
Did I mention they are a great little Hostess,
 Neighbor, Teacher, etc. Gift?
How sweet is this little Rose Bud Bouquet?
My daughter made this for me for Valentine's Day last year.
But what a sweet little Christmas gift ♥ 
Materials Needed:
2 Hershey's Kisses Candies
Wooden Skewer
Colored Cellophane (You Can Use Clear)
Floral Tape
Silk Flower Leaves (optional)
Cellophane Tape
Scissors

Instructions: Use a small, rolled piece of tape to hold the two wrapped candy Kisses together, bottom to bottom. Cut a piece of colored cellophane into a 6" square. Place the tip of one of the kisses into the center of the cellophane and then fold the cellophane up around both kisses. Twist the cellophane to secure it.
Hold the wrapped kisses against the end of the wooden skewer and wrap it tightly with floral tape, winding the tape all of the way down the stick. If desired, you can add silk flower leaves and attach them to the stem using the floral tape.
Wishing you and yours 25 days of #MerryKissmas!!
and, of course, Pinterest for some great Seasonal Inspirations!
 “I received these products complimentary from Influenster for testing purposes.”

Wednesday, December 3, 2014

How to Recycle Halloween Pumpkins for Wildlife


One of my favorite parts of Halloween, is carving pumpkins.
My evening walks through the neighborhood are even better with the bright orange pumpkins, highlighting the colors of autumn, and showing off creative designs.

After the trick-or-treaters clear away, and Halloween is officially over, don’t trash your pumpkins! There are several ways to recycle them with wildlife and your garden in mind. How do you reuse pumpkins in your yard?

Compost Your Pumpkins
If you’ve carved a jack-o-lantern, it may already be decomposing. Pumpkins are 90% water, which means they easily and quickly break down. This makes them a great addition to your compost pile. Prevent unwanted pumpkin plants by removing the seeds first (set seeds aside for #3 and #5). If you don’t have a compost bin or pile, check your local government, nearby farms, or community gardens to see if they collect old pumpkins.

Make a Snack-o-Lantern
This is one of the most creative ideas I’ve seen to recycle pumpkins. You can turn your jack-o-lantern into a snack-o-lantern for wildlife! It’s fairly easy to make, and the squirrels and birds will love it.
Find out how to make a snack-o-lantern!
Leave Seeds for Wildlife
Large birds and small mammals will eat pumpkin seeds if you offer them in your yard. Collect seeds from your pumpkins, before composting them, and let the seeds dry. Please don’t add salt or seasoning. Place seeds on a flat surface, tray, shallow bowl, or mix in with existing bird seed in your garden.

Plant Pumpkin Seeds
The squash bee is one of many insects to pollinate pumpkin flowers. If you have room in your yard, you can save seeds for a harvest of pumpkins next year

Bee pollinating a pumpkin flower by Paul Gardner.


Sunday, November 30, 2014

Major Fall Garden Clean Up

Life has been just a little crazy lately, so this post is slightly late...
I started a MAJOR garden Clean and Prune the beginning of October. Thinking I'd be done by November 1st when the city comes around and starts to pick up piles of garden waste you've put in the street.

I started in the backyard,
hauling the debris to the street.

As you can see the pile grows

and grows!
And that's just the backyard!

I thought I'd never say this but I did a Dad Prune on the whole garden!  A Dad Prune is when there's maybe about a foot of the plant/Roses left afterwards.
I usually just shape the plant back to a desired size
but not make it naked! LOL
But after 20 years, it was due.
I removed a lot of dead wood, the plants I lost from the drought last Winter, and removed all fallen leaves on the ground that were left from the last 20 years.

I have to say, the soil underneath the leaves was BEAUTIFUL!! Loamy and full of worms.

Back Garden Before

I removed a few small trees,

Pruned the Cherry back into shape and
limbed the Podocarpus way up
so the Apple and Rose of Sharon could get more sun.

There's a water fall in there some where :/


A Tangle of Grapes, Heavenly Bamboo, Roses and Buddleia

The gazebo was swallowed by the Honeysuckle
and climbing Cecil Brunner

Really, it's in there somewhere!


 After
Clean as a whistle!


Tamed!


Moving all birdhouses and related items to side fence for a dry garden...darn drought.
Bunny Lane will be there too :)

The one thing we had left to do was trim the neighbors Weeping Willow, which we did the other day :)


Front Before

Lavender out of control!

Roses, Pomegranate and Rosemary taking over

Lambs Ears has gone wild!


Bike being engulfed by Rosemary


Front After
It's all cleaned up!
See what I mean by a Dad Prune?
But you can see my Spring Bulbs popping up,
nothing to get in their way.

All 20 years of leaves raked down to a
beautiful healthy soil with lots of Leaf Mold

Now I just need it to rain and all the trees drop their
leaves so my gardens can start it's next 20 years of compost.

 My pile is now double parked!
We still need to take down another tree and 
prune the big front Tree, then we'll be done.
The City finally showed up about the 15th to clear this pile.
But I have another started. he he! 


.

.
Blog Widget by LinkWithin